

Our latest construction project in our house is all about the cat as well. At least that's what we tell her. Really it's for us. We've had plans for a first floor bathroom for a while, but haven't gotten to it. After some knee problems last fall, it became clear that had to rise on our priority list when it became painful for several months to climb the stairs. Since we are creating the bathroom in a space that wasn't originally a separate room, there is no radiator there. It will be a full bathroom with separate tub and shower adjacent to a downstairs bedroom when completed, but will probably be used most often as a downstairs powder room and will gain most of it's heat from the surrounding rooms. However, when it is used for bathing or particularly cold out, the bathroom will need it's own heat so our plan had always been to install a ceramic tile floor with radiant heating underneath.
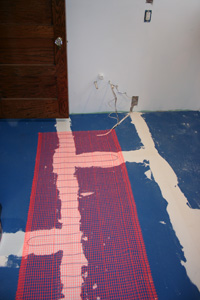 For a ceramic tile installation, the radiant heat mesh is installed over the cement board. The directions and accompanying video are very specific about keeping the area where the mesh will be installed clean and being very careful about not cutting or stapling through the wiring! A small trench is dug in the cement board to hide the wiring at the end of the mesh where it goes into the wall to connect to electricity and the thermostat.
  (While it took 10 minutes max in the DIY video to lay the mesh, hot glue and staple it to the underlayment, cut the trench, wire it up, and test it after every step, it took somewhat longer than that.) Tile is then laid as normal, being careful to not scrape your trowel too hard across the mesh (or get your foot stuck in it!) Then, voila! A radiant floor! One thing we found is that larger tiles would have been a better idea over the radiant section of the floor. Because you need a relatively thick layer of mortar to cover the mesh and hold the tiles in place, there was a lot of oozing in the small tiles which meant a huge amount of clean up to get the spaces between the tiles clean for grouting.
 As you can see above, the radiant section of the floor has black square tiles set into the field of white octagonal tiles. To the left in the photo is where the shower will be. Directly in front is where the sink will be, the tub will be to the right of the sink, under the window, and the toilet will be to the bottom right. The photo is taken from the door into the bedroom. The floor still needs to be grouted and we need to insulate under the floor from the crawlspace below to complete the flooring project and get to the wainscoting and fixtures.
No word from the cat yet on what she thinks of this project to warm her tootsies in winter and cool her tummy in summer. But remember, design that's good for the cat is good for her humans!
No comments:
Post a Comment