Showing posts with label bathroom. Show all posts

Friday, September 7, 2012

Adventures in Sandblasting

It's been a while since the last post, mostly because we haven't been doing much preservation-related. We got a sandblaster back in July that sat in the living room for a couple of months because a part was broken. We had gotten so used to it being part of the scenery that I had forgotten it didn't belong there until I started to dust it. We've gotten the sandblaster fixed now and moved it from the living room. We've also gotten the cast iron claw foot tub that precipitated the need for the sandblaster. This is a friend's tub that had been used outdoors as a horse trough for a while. The inside enamel is fine, but the outside wasn't quite ready for prime time. Enter the sandblaster.


We're learning about sandblasting as we go. While we've done it before, it was in a shop situation where everything was set up for us. We didn't have to choose the sand and find out the hard way that a sieve is really, really handy. In other words, the first day's sandblasting was a bit of a dud. The play sand clogged up the hose and more time was spent unclogging than blasting. We found blasting media at a local Tractor Supply and tried that next. It worked much better, though still clogged periodically.


The tub is going in our downstairs bathroom which has white tile with black accents. We decided the outside of the tub would be shiny black so it was primed first.


We then used 3 coats of black spray paint to cover the tub. We did this Labor Day weekend, which, anyone in the eastern half of the country knows was still stuck in the weather patterns caused by Hurricane Isaac. There were storms popping up here and there all weekend. It seemed that every time we went out to sandblast or paint, it would start sprinkling, then pouring rain. Persistence paid off though and we got it done!


Now the other story that goes along with the clogged sandblaster and the popup showers is that a cast iron claw foot tub is HEAVY!  We got it onto the truck with help from friends. The sawhorses you see it sitting on in the photos were about the same height as the truck bed so we could just slide it off and onto them. But getting in the house?? Not a job for the 2 of us (the one of us not pictured is just too whimpy!) So the tub sat in our yard for a week under a tarp and, since we live 30 miles away from our strongest friends, once it was painted we had no idea how to get it into the house. Fortunately, we were saved by a Virginia Tech football game. Friends dropped by our house to see us and we got them to help move the tub in.


Now the tub's inside and sitting on its side. We got to see inside the tub for the first time and are now working to clean all the stains from its previous life. We also need to decide what color to paint the claw feet and find the missing cleat for one of the feet to attach it to the bottom of the tub. Then we can flip it upright, plumb it, and relax in warm, blissful bubbles!

Monday, May 23, 2011

Salvaging What We Can

We're currently in the demolition phase of the rehabilitation of our project house.  That means we've been wielding our sledgehammers and have got a dumpster outside.  We're pretty selective about what we're throwing away though:  
  • The old wood windows will stay and be reworked.  We'll add storm windows to make them just as efficient as new double-glazed windows.
  • Some of the doors will stay and be stripped and repainted.  The front door is a new door so we'll get rid of that.  Not all of the interior doors match and we'll be changing the layout of the rooms, so we'll be visiting our local architectural salvage to buy some solid wood 5-panel doors.
  • The wood floors just need to be refinished.  The old yellow spotted linoleum kitchen floor and vinyl bathroom floor will go.
  • Lumber and trim will be reused in this house or another.
  • The bricks from the chimneys that are no longer necessary will surround planting beds and create a retaining wall in the yard.
  • The acoustic tile ceilings?  Outta here.
  • Old insulation? What old insulation?
  • Old metal pipes, electrical wiring with copper in it, and the old appliances will be recycled.
  • The old kitchen cabinets will find new life in the shed in the backyard.
  • The old blue bathroom fixtures will be donated to the local ReStore.  (Can you believe the architectural salvage place wouldn't buy them from us?!?)


It's in everyone's best interest to be selective about demolition debris.  The bottom line for us is money savings: a lighter dumpster means cheaper tipping fees and reusing materials means we don't have to purchase them new.  The less that ends up in the landfill and the more that we can reuse, the better.  Reused materials mean less energy is consumed in making new and probably inferior products.  It's a little more effort for us, but worth it in the long run.

Tuesday, January 25, 2011

Preservation, Renovation, New Construction: It's All About the Cat

At every critique, one of our architecture professors, Mike O'Brien, used to ask, "where will the cat sleep?"  Now, if you think about it, that's a pretty valid question.  Cats, long known for their innate design aesthetic, will naturally migrate towards the sunniest, warmest, and quietest spot in the house.  That spot will be the favorite location for human inhabitants as well.

In our house, we have several favorite cat spots that center around the windows and radiators.  On the first floor, the living room radiator is the perfect spot in the winter.  It warms from the bottom up while providing a nice view of the outside world.  Afternoon sunbeams just add to the ambiance of the spot.  In summer, the same location is great for window hunting and catching a cool mountain breeze.  Upstairs, we have a similar spot on a window seat with a radiator nearby for winter warmth and no direct sun for summer cooling.  The best place for the cat to sleep is in the sitting room which has 6 windows and sunbeams throughout the day, but we keep that to ourselves so that our house plants have a chance to grow and thrive without nibbled leaves.

Our latest construction project in our house is all about the cat as well.  At least that's what we tell her.  Really it's for us.  We've had plans for a first floor bathroom for a while, but haven't gotten to it.  After some knee problems last fall, it became clear that had to rise on our priority list when it became painful for several months to climb the stairs.  Since we are creating the bathroom in a space that wasn't originally a separate room, there is no radiator there.  It will be a full bathroom with separate tub and shower adjacent to a downstairs bedroom when completed, but will probably be used most often as a downstairs powder room  and will gain most of it's heat from the surrounding rooms.  However, when it is used for bathing or particularly cold out, the bathroom will need it's own heat so our plan had always been to install a ceramic tile floor with radiant heating underneath.

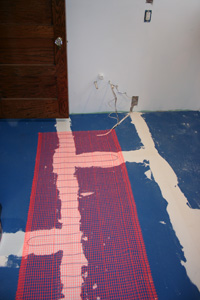
For a ceramic tile installation, the radiant heat mesh is installed over the cement board.  The directions and accompanying video are very specific about keeping the area where the mesh will be installed clean and being very careful about not cutting or stapling through the wiring!  A small trench is dug in the cement board to hide the wiring at the end of the mesh where it goes into the wall to connect to electricity and the thermostat.  (While it took 10 minutes max in the DIY video to lay the mesh, hot glue and staple it to the underlayment, cut the trench, wire it up, and test it after every step, it took somewhat longer than that.)  Tile is then laid as normal, being careful to not scrape your trowel too hard across the mesh (or get your foot stuck in it!)  Then, voila! A radiant floor!  One thing we found is that larger tiles would have been a better idea over the radiant section of the floor.  Because you need a relatively thick layer of mortar to cover the mesh and hold the tiles in place, there was a lot of oozing in the small tiles which meant a huge amount of clean up to get the spaces between the tiles clean for grouting.    


As you can see above, the radiant section of the floor has black square tiles set into the field of white octagonal tiles.  To the left in the photo is where the shower will be.  Directly in front is where the sink will be, the tub will be to the right of the sink, under the window, and the toilet will be to the bottom right.  The photo is taken from the door into the bedroom.  The floor still needs to be grouted and we need to insulate under the floor from the crawlspace below to complete the flooring project and get to the wainscoting and fixtures.  

No word from the cat yet on what she thinks of this project to warm her tootsies in winter and cool her tummy in summer.  But remember, design that's good for the cat is good for her humans!