Once we got that mid-century rancher on the market, we had some time to work on our own house. Remember that 1913 American Four Square that lends its name to this blog? Well, we've owned it for almost 11 years now, and it's still not done. And once in a while, we have the free time to work on it. Since we had such a cold and snowy winter and our other projects are unheated, our house won.
The master bedroom was nearly done, but had been awaiting a ceiling, reworking one of the windows, and the stripping and reinstallation of the doors and trim for some time. We moved everything out of the room and polyurethaned the floor one more time for good measure too.
The result feels posh, cozy, and hotel-like. What you don't see is all the work that went into that one room over the years. The roof leaked at the chimney and the dormer when we first moved in so we couldn't use the room until we got that fixed. The water damaged the ceiling and walls so we gutted the room to insulate the walls and put furring on the ceiling to allow us to cover it with a layer of sheetrock (which was the view from the bed for a number of years). We replaced all of the electrical wires in the house so we were able to put outlets and ceiling lights were we needed them. In a house without air conditioning, a ceiling fan is crucial! The wood windows have been reglazed, the weight pockets insulated, and the ropes reinstalled. The floor was sanded and refinished....Phew! Done! Now it's warm outside, so on to the garage!
Showing posts with label our house. Show all posts
Monday, April 28, 2014
Friday, September 7, 2012
Adventures in Sandblasting
It's been a while since the last post, mostly because we haven't been doing much preservation-related. We got a sandblaster back in July that sat in the living room for a couple of months because a part was broken. We had gotten so used to it being part of the scenery that I had forgotten it didn't belong there until I started to dust it. We've gotten the sandblaster fixed now and moved it from the living room. We've also gotten the cast iron claw foot tub that precipitated the need for the sandblaster. This is a friend's tub that had been used outdoors as a horse trough for a while. The inside enamel is fine, but the outside wasn't quite ready for prime time. Enter the sandblaster.
We're learning about sandblasting as we go. While we've done it before, it was in a shop situation where everything was set up for us. We didn't have to choose the sand and find out the hard way that a sieve is really, really handy. In other words, the first day's sandblasting was a bit of a dud. The play sand clogged up the hose and more time was spent unclogging than blasting. We found blasting media at a local Tractor Supply and tried that next. It worked much better, though still clogged periodically.
The tub is going in our downstairs bathroom which has white tile with black accents. We decided the outside of the tub would be shiny black so it was primed first.
We then used 3 coats of black spray paint to cover the tub. We did this Labor Day weekend, which, anyone in the eastern half of the country knows was still stuck in the weather patterns caused by Hurricane Isaac. There were storms popping up here and there all weekend. It seemed that every time we went out to sandblast or paint, it would start sprinkling, then pouring rain. Persistence paid off though and we got it done!
Now the other story that goes along with the clogged sandblaster and the popup showers is that a cast iron claw foot tub is HEAVY! We got it onto the truck with help from friends. The sawhorses you see it sitting on in the photos were about the same height as the truck bed so we could just slide it off and onto them. But getting in the house?? Not a job for the 2 of us (the one of us not pictured is just too whimpy!) So the tub sat in our yard for a week under a tarp and, since we live 30 miles away from our strongest friends, once it was painted we had no idea how to get it into the house. Fortunately, we were saved by a Virginia Tech football game. Friends dropped by our house to see us and we got them to help move the tub in.
Now the tub's inside and sitting on its side. We got to see inside the tub for the first time and are now working to clean all the stains from its previous life. We also need to decide what color to paint the claw feet and find the missing cleat for one of the feet to attach it to the bottom of the tub. Then we can flip it upright, plumb it, and relax in warm, blissful bubbles!
Labels:
bathroom,
historic preservation,
our house,
plumbing,
salvage
Friday, May 25, 2012
The Cost of Cleaning a Dryer Vent
It started as a simple question really, but then it all does, doesn't it? The question? "Could you please clean the dryer vent? It smells funny." Since it hadn't been cleaned really well in a while, my husband took this opportunity to give the dryer vent the cleaning of all cleanings. He pulled out the dryer, unhooked the gas line, and unhooked the washer hoses too to really get in there to the vent line. He took the dryer apart, used the Lint Lizard we were given by his mom, and got every speck of lint out of the dryer itself. He took the scrunchy metal vent pipe outside and washed it thoroughly.
Our dryer is not on an outside wall so there is a traditional metal vent pipe to the wall which attaches to a piece of PVC sewer pipe to get it to the outside vent. This is to code and generally works just dandily. That also means you can do crazy stuff with it like hose it down to get all the linty muck out of it. He did just that, sending a soggy pile of lint flying out the side of the house. It took all day to clean the dryer vent, but that was okay. All was clean. All was good.
And then he came to me at 4pm on Sunday afternoon and said we needed to make an emergency trip to Lowes. After checking to see that they were still open (till 7!), we drove the 25 miles to our closest home improvement store to buy new washer hoses. They worked. We did some laundry. All was good.
And then on Monday, I noticed something smelled a bit off. It seemed to be the dryer. But worse than that, there was a bit of a gas smell. Yes, the gas line was leaking too. Another trip to Lowes later, the gas line was replaced. We did some more laundry. All was good.
And then on Thursday, I noticed an odd, sort of wet paper sort of smell downstairs. It has been raining a lot so I thought maybe some water had gotten in somewhere. Later in the day, I happened to look up while I was in the kitchen and saw a bubble in the ceiling. Under the washing machine connections. I ran upstairs to turn the water off up there and the cold water valve sprayed at me as I tried to close it. Off went the water to the second floor. All was not good.
My husband didn't get home until late that evening and had to do something with the plumbing. The water was off upstairs to keep it from leaking and with the water off, that meant no showers. So, out came the sheetrock saw and, with it, the wall around the washing machine pipes. Of course, for some odd reason, he had put a second valve in the wall for the hot water, but not the cold and, of course, it was the cold that was leaking. Fortunately, he had the pieces around to fix that problem and installed a cold water valve for the night. In the process, he spilled the purple primer all over himself (which apparently burns quite a bit!). All was not good.
So, at the moment, we are without a washer and dryer. And the cost of cleaning the dryer vent? We've spent $50 on new hoses and a gas line. And there's more cost to come to fix the pipes for the washing machine connection, the wall that we tore open to get to the pipes, and the ceiling in the kitchen with the water bulge.
Oh, and the dryer vent still smells funky.
Our dryer is not on an outside wall so there is a traditional metal vent pipe to the wall which attaches to a piece of PVC sewer pipe to get it to the outside vent. This is to code and generally works just dandily. That also means you can do crazy stuff with it like hose it down to get all the linty muck out of it. He did just that, sending a soggy pile of lint flying out the side of the house. It took all day to clean the dryer vent, but that was okay. All was clean. All was good.
And then he came to me at 4pm on Sunday afternoon and said we needed to make an emergency trip to Lowes. After checking to see that they were still open (till 7!), we drove the 25 miles to our closest home improvement store to buy new washer hoses. They worked. We did some laundry. All was good.
And then on Monday, I noticed something smelled a bit off. It seemed to be the dryer. But worse than that, there was a bit of a gas smell. Yes, the gas line was leaking too. Another trip to Lowes later, the gas line was replaced. We did some more laundry. All was good.
And then on Thursday, I noticed an odd, sort of wet paper sort of smell downstairs. It has been raining a lot so I thought maybe some water had gotten in somewhere. Later in the day, I happened to look up while I was in the kitchen and saw a bubble in the ceiling. Under the washing machine connections. I ran upstairs to turn the water off up there and the cold water valve sprayed at me as I tried to close it. Off went the water to the second floor. All was not good.
My husband didn't get home until late that evening and had to do something with the plumbing. The water was off upstairs to keep it from leaking and with the water off, that meant no showers. So, out came the sheetrock saw and, with it, the wall around the washing machine pipes. Of course, for some odd reason, he had put a second valve in the wall for the hot water, but not the cold and, of course, it was the cold that was leaking. Fortunately, he had the pieces around to fix that problem and installed a cold water valve for the night. In the process, he spilled the purple primer all over himself (which apparently burns quite a bit!). All was not good.
So, at the moment, we are without a washer and dryer. And the cost of cleaning the dryer vent? We've spent $50 on new hoses and a gas line. And there's more cost to come to fix the pipes for the washing machine connection, the wall that we tore open to get to the pipes, and the ceiling in the kitchen with the water bulge.
Oh, and the dryer vent still smells funky.
Friday, February 17, 2012
We're Still Here!
Just a note to say we're still here. We haven't fallen off the face of the blogosphere or maimed ourselves with powertools. Our projects on our own house have mostly consisted of painting and tiling - nothing worth blogging about. And life (and the cold weather!) has gotten in the way of much progress on our project house.
Things will pick up here soon, so keep checking back - we're still here!
Thursday, August 4, 2011
A New Roof at Westview
In a perfect world, all fixer-uppers would have a new roof and those of us crazy enough to take them on wouldn't have to worry about that one little detail. Unfortunately, when people give up on a house, it seems that the expense of replacing a roof is one of the reasons they give up. The house we live in had multiple leaks when we first bought it and the remains of some really bad attempts at plugging up missing flashing with roofing tar and caulking. We got the flashing fixed and a few roofing tiles replaced and we've been dry ever since.
At the Westview project house, we knew there were roofing issues when we bought the house. The blue tarps were the first clue. The old curling asphalt shingles that blew off in the mountain winds were the second. We've had a roofer lined up for several months now, but since we're in no hurry, we told them they could put us later in the queue. Well, this week, they finally got to us. They took the old roof off Monday morning. Fortunately, despite the terrible condition of the old roof, it hadn't been leaking enough to damage the oak decking so little work had to take place before replacement could begin. As of yesterday afternoon (prior to the thunderstorms, fortunately), we had a new asphalt architectural shingled roof! Very nice, except that it highlights the peeling paint on the attic windows.
The other slight problem was that the power line to the house was rather precarious and the debris coming off the roof pulled the power line free from the house. So, we called to have the power company look at it since the roofers mentioned it had sparked when it pulled free and we didn't want to burn the house down. The power company came by, took one look at that old power line, cut it, and took the meter. Sooo, now we have NO power. We only had one operational outlet anyway because the wiring in the house was downright dangerous, but this sets us back a bit since we don't own a generator. We're investigating now how to get minimal power for construction. At least painting windows can be done without a power source!
Tuesday, July 12, 2011
The Cherry on Top of a Historic Building
I've been thinking about chimneys. Maybe it's all the talk of Christmas in July (Santa Claus, you know) or maybe it's because we've got some whimpy little chimneys on our project house. There are 2 chimneys and it looks like every room had a coal stove, but no fireplaces, so there was no need for more than a narrow passage for the smoke. The chimney that ends in the kitchen is propped on 2x4s and didn't even reach to the basement. Since there's no real reason to keep these chimneys and they aren't what you'd call an architectural feature, we're going to tear them down when the roof is redone.
On our own house, we had the two chimneys rebuilt and lined so that we could use one for the boiler exhaust and possibly gas logs in the shallow fireplace one day. The other chimney appears to never have been used (it had no soot or penetrations) and seems like it's only there to provide some symmetry to the American Four Square.
Back in the day, chimneys were just one area that masons were able to show their skill and pride in their work. There are gorgeous examples throughout the country that are most definitely architectural features that help to define the historic character of their buildings. Check out some great examples below and don't forget to look up!
![]() |
| Bacon's Castle, Surry, VA |
![]() |
| Shirley Plantation, Charles City, VA |
![]() |
| Westover, Charles City, VA |
![]() |
| Smithfield Plantation, Blacksburg, VA |
![]() |
| Frontier Culture Museum, Staunton, VA |
![]() |
| Falling Water, Mill Run, PA |
Monday, March 7, 2011
Hidden Treasures
If you've ever taken walls down or removed trim in an old house, you've probably found hidden treasures. There's always the hope of finding enough cash to pay for the house rehab, but usually you're more likely to find the items of everyday life. Ticket stubs, photographs, buttons, and loose change slide get lost under the base molding. Mice move newspapers, clothing, and other nesting materials into walls. And sometimes items are dropped or placed in the walls during construction. All of these treasures tell a story of the history of the house, its occupants, and the local area.
We live across the street from an old movie theater and found movie ticket stubs, an ad for an upcoming movie, an old movie reel, and even a single frame of an as-yet unidentified movie. We found lots of loose change, dating back to the early 1900s when the house was built, though unfortunately no coins worth much more than their face value. We have lots of loose buttons, a hair pin, and razor blades.
We had a few small mouse nests with old newspapers and a sock or two incorporated in them. Of course, one of the most famous mouse nests was found at Thomas Jefferson's Poplar Forest where the nest provided an archaeological look at life in the 19th century. Travis McDonald provides an interesting look at the Poplar Forest nest in "Rat Housing in Middle Virginia: The Diffusion of Every Day Life" in Perspectives in Vernacular Architecture
. Our nest wasn't nearly that elaborate (thank goodness!) or exciting, but still provided a look at the early 20th century.
One of the more interesting items we found was a small glass from the 1893 Chicago World's Fair with the house's first owner's name painted on it. The glass was placed on top of the header of the door between the master bedroom and sitting room. It was obviously placed to be found by someone removing trim to renovate the house in the future.
What are we doing with these found objects? We've created a display case in one of the walls where we'll put many of the treasures behind glass. The back of the case is the back side of one of the plastered walls with the oak 2"x4" framing in the center so the construction of the house is visible as well. We're creating our own museum to display our hidden treasures.
Tuesday, February 15, 2011
Restoration, Rehabilitation, and Insulation
The Secretary of the Interior is pretty clear about the differences between restoration and rehabilitation of historic properties. Restoration "focuses on the retention of materials from the most
significant time in a property's history, while permitting the removal of materials from
other periods" while Rehabilitation "emphasizes the retention and repair of historic
materials, but more latitude is provided for replacement because it is assumed the
property is more deteriorated prior to work." In addition, the historical importance, physical condition, proposed use, and code requirements should be taken into consideration when choosing a treatment for the building.
In the area where we live, economics have never been such that large, showy houses were built. Because we are relatively isolated, most building occurred in the late 1800s and early 1900s, with a building boom in the 1940s related to growing industry. Most of the houses here reflect the blue collar nature of the jobs available and are simple, vernacular homes with some bungalows and American four squares thrown in. Taken together, the houses create an interesting, varied, and historic streetscape, but very few places in the county have been nominated for the National Register.
Our house was built by the town doctor and is one of the more majestic-looking in our town. Yet despite the exterior, the interior is very simple and plain. Most, but not all of the trim and doors are oak, but the trim is basic and easily replicable (or findable at the salvage yard). Our house doesn't have the Craftsman details and built-ins popular in many houses of the time. There is just one shallow fireplace with a very simple mantle. The walls are plaster, but not in great shape. And our house, as were many other larger homes in the area, was broken up into apartments during the building boom of the 1940s.
For us, the lack of Craftsman details and poor plaster is a blessing in disguise. It means that we don't feel obligated to restore the house back to the time when the details were new. We can really do what we please inside the house to make it livable without concern for fancy woodwork, because we just don't have it. That said, we have removed traces of the apartments, found where the original doorways were and generally restored the spaces to what they were when the house was built. We are fortunate to have most of the original doors and trim and have been able to find replacements where the originals were lost.
Most importantly though, because we aren't restoring the house, but instead are rehabilitating it, we could insulate it without feeling (much) guilt for replacing the plaster exterior walls with sheetrock. Now we certainly recognize that many of you are frowning at us for doing that. However, we live in a climate with strong winds and cold winter weather and it makes more sense to reduce our heating bills with insulation than to keep and patch plain 1913 plaster walls. Were this house older, if it were in a different climate, if the walls were more significant due to plaster details or wainscoting or other trim, or if the exterior were wood so that it could be insulated from outside, we would have considered other alternatives. But, for our own comfort and the continuing use of this house, this was the right rehabilitation plan for this house.
In the area where we live, economics have never been such that large, showy houses were built. Because we are relatively isolated, most building occurred in the late 1800s and early 1900s, with a building boom in the 1940s related to growing industry. Most of the houses here reflect the blue collar nature of the jobs available and are simple, vernacular homes with some bungalows and American four squares thrown in. Taken together, the houses create an interesting, varied, and historic streetscape, but very few places in the county have been nominated for the National Register.

Our house was built by the town doctor and is one of the more majestic-looking in our town. Yet despite the exterior, the interior is very simple and plain. Most, but not all of the trim and doors are oak, but the trim is basic and easily replicable (or findable at the salvage yard). Our house doesn't have the Craftsman details and built-ins popular in many houses of the time. There is just one shallow fireplace with a very simple mantle. The walls are plaster, but not in great shape. And our house, as were many other larger homes in the area, was broken up into apartments during the building boom of the 1940s.
For us, the lack of Craftsman details and poor plaster is a blessing in disguise. It means that we don't feel obligated to restore the house back to the time when the details were new. We can really do what we please inside the house to make it livable without concern for fancy woodwork, because we just don't have it. That said, we have removed traces of the apartments, found where the original doorways were and generally restored the spaces to what they were when the house was built. We are fortunate to have most of the original doors and trim and have been able to find replacements where the originals were lost.
Most importantly though, because we aren't restoring the house, but instead are rehabilitating it, we could insulate it without feeling (much) guilt for replacing the plaster exterior walls with sheetrock. Now we certainly recognize that many of you are frowning at us for doing that. However, we live in a climate with strong winds and cold winter weather and it makes more sense to reduce our heating bills with insulation than to keep and patch plain 1913 plaster walls. Were this house older, if it were in a different climate, if the walls were more significant due to plaster details or wainscoting or other trim, or if the exterior were wood so that it could be insulated from outside, we would have considered other alternatives. But, for our own comfort and the continuing use of this house, this was the right rehabilitation plan for this house.
Labels:
demolition,
DIY,
historic preservation,
our house,
rehabilitation,
restoration
Tuesday, February 1, 2011
Baby It's Cold Outside: Choosing a New Heating System
We bought our house in January 2003. We had the luxury of working on the house before we moved into it so things like heat were less of a priority than they would have been otherwise. However, this was one of the coldest Januarys in recent memory, or so it seemed to us. The temperature remained below freezing for weeks, unusual here in Southwest Virginia. If we were going to work on the house comfortably, one of the first things on our agenda was to start the boiler.
We had the natural gas turned on thinking it couldn't be that hard to light the furnace. We knew from looking at it that it was old and probably a gas guzzler, but the previous owners had used it, so it must work. Right? Wrong. Since the house had been empty for a bit, the gas company stuck around to see if there were any leaks when the furnace started. Well, we tried and couldn't figure out how to light the thing. The gas company representative tried for a half hour or so and couldn't get the thing started. At that point, we decided that heat was over-rated. We had been told the radiators were drained (apparently mostly, but not completely, but that's another story) and we wouldn't be living there so we decided to go heatless. In the dead of winter.
Things to think about when buying a new heating system:
- Make sure the company you buy it from knows how to service it. We've had several occasions where we've known more about the service than the technicians and have had to tell them how they broke it. Or how to restart it.
- Consider zoning the system. Our second floor is always hotter than the first during heating season. If we had zoned the system, we could turn the heat down upstairs or up downstairs. As it is, downstairs holds steady at the temperature on the thermostat while upstairs is summery.
- If your system adjusts to the outside air temperature like ours does, be sure to put the sensor on the north side of the house. Our sensor was originally next to the gas meter on the west side of the house. In the afternoon sun. Against a brick wall radiating heat well into the evening. Unless it was a rainy day, we were cold. The sensor thought it was much warmer out than it was, so the boiler either didn't think it was necessary to come on or would provide very little heat.
- Programmable thermostats are the way to go. We tend to be very predictable people and we want to be warm when we're up and about. The thermostat is programmed for the heat to be higher in the morning when we get up, lower during the day when we're working around the house or out and about, and higher in the evening when we're more likely to be sitting. Our house holds heat well during the time that the heat is lower and absorbs sun during the day, so the extremes aren't significant.
- Insulate, insulate, insulate! It doesn't matter how efficient your heating system is if your house is drafty. Insulate your walls, attic, and crawl spaces. Put weatherstripping around your windows and doors and add storms.
- If you have the option of having your boiler provide your hot water, do it. Our water is always hot, never runs out, and can be used by more than one person at once. The boiler keeps a few gallons of water hot year-round, then kicks on to provide unlimited hot water for showers, washing, and kitchen use for minimal cost.
Tuesday, January 25, 2011
Preservation, Renovation, New Construction: It's All About the Cat
At every critique, one of our architecture professors, Mike O'Brien, used to ask, "where will the cat sleep?" Now, if you think about it, that's a pretty valid question. Cats, long known for their innate design aesthetic, will naturally migrate towards the sunniest, warmest, and quietest spot in the house. That spot will be the favorite location for human inhabitants as well.
In our house, we have several favorite cat spots that center around the windows and radiators. On the first floor, the living room radiator is the perfect spot in the winter. It warms from the bottom up while providing a nice view of the outside world. Afternoon sunbeams just add to the ambiance of the spot. In summer, the same location is great for window hunting and catching a cool mountain breeze. Upstairs, we have a similar spot on a window seat with a radiator nearby for winter warmth and no direct sun for summer cooling. The best place for the cat to sleep is in the sitting room which has 6 windows and sunbeams throughout the day, but we keep that to ourselves so that our house plants have a chance to grow and thrive without nibbled leaves.
Our latest construction project in our house is all about the cat as well. At least that's what we tell her. Really it's for us. We've had plans for a first floor bathroom for a while, but haven't gotten to it. After some knee problems last fall, it became clear that had to rise on our priority list when it became painful for several months to climb the stairs. Since we are creating the bathroom in a space that wasn't originally a separate room, there is no radiator there. It will be a full bathroom with separate tub and shower adjacent to a downstairs bedroom when completed, but will probably be used most often as a downstairs powder room and will gain most of it's heat from the surrounding rooms. However, when it is used for bathing or particularly cold out, the bathroom will need it's own heat so our plan had always been to install a ceramic tile floor with radiant heating underneath.
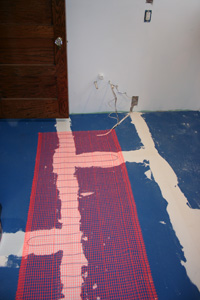
For a ceramic tile installation, the radiant heat mesh is installed over the cement board. The directions and accompanying video are very specific about keeping the area where the mesh will be installed clean and being very careful about not cutting or stapling through the wiring! A small trench is dug in the cement board to hide the wiring at the end of the mesh where it goes into the wall to connect to electricity and the thermostat.
(While it took 10 minutes max in the DIY video to lay the mesh, hot glue and staple it to the underlayment, cut the trench, wire it up, and test it after every step, it took somewhat longer than that.) Tile is then laid as normal, being careful to not scrape your trowel too hard across the mesh (or get your foot stuck in it!) Then, voila! A radiant floor! One thing we found is that larger tiles would have been a better idea over the radiant section of the floor. Because you need a relatively thick layer of mortar to cover the mesh and hold the tiles in place, there was a lot of oozing in the small tiles which meant a huge amount of clean up to get the spaces between the tiles clean for grouting.
As you can see above, the radiant section of the floor has black square tiles set into the field of white octagonal tiles. To the left in the photo is where the shower will be. Directly in front is where the sink will be, the tub will be to the right of the sink, under the window, and the toilet will be to the bottom right. The photo is taken from the door into the bedroom. The floor still needs to be grouted and we need to insulate under the floor from the crawlspace below to complete the flooring project and get to the wainscoting and fixtures.
No word from the cat yet on what she thinks of this project to warm her tootsies in winter and cool her tummy in summer. But remember, design that's good for the cat is good for her humans!
In our house, we have several favorite cat spots that center around the windows and radiators. On the first floor, the living room radiator is the perfect spot in the winter. It warms from the bottom up while providing a nice view of the outside world. Afternoon sunbeams just add to the ambiance of the spot. In summer, the same location is great for window hunting and catching a cool mountain breeze. Upstairs, we have a similar spot on a window seat with a radiator nearby for winter warmth and no direct sun for summer cooling. The best place for the cat to sleep is in the sitting room which has 6 windows and sunbeams throughout the day, but we keep that to ourselves so that our house plants have a chance to grow and thrive without nibbled leaves.
Our latest construction project in our house is all about the cat as well. At least that's what we tell her. Really it's for us. We've had plans for a first floor bathroom for a while, but haven't gotten to it. After some knee problems last fall, it became clear that had to rise on our priority list when it became painful for several months to climb the stairs. Since we are creating the bathroom in a space that wasn't originally a separate room, there is no radiator there. It will be a full bathroom with separate tub and shower adjacent to a downstairs bedroom when completed, but will probably be used most often as a downstairs powder room and will gain most of it's heat from the surrounding rooms. However, when it is used for bathing or particularly cold out, the bathroom will need it's own heat so our plan had always been to install a ceramic tile floor with radiant heating underneath.
For a ceramic tile installation, the radiant heat mesh is installed over the cement board. The directions and accompanying video are very specific about keeping the area where the mesh will be installed clean and being very careful about not cutting or stapling through the wiring! A small trench is dug in the cement board to hide the wiring at the end of the mesh where it goes into the wall to connect to electricity and the thermostat.
(While it took 10 minutes max in the DIY video to lay the mesh, hot glue and staple it to the underlayment, cut the trench, wire it up, and test it after every step, it took somewhat longer than that.) Tile is then laid as normal, being careful to not scrape your trowel too hard across the mesh (or get your foot stuck in it!) Then, voila! A radiant floor! One thing we found is that larger tiles would have been a better idea over the radiant section of the floor. Because you need a relatively thick layer of mortar to cover the mesh and hold the tiles in place, there was a lot of oozing in the small tiles which meant a huge amount of clean up to get the spaces between the tiles clean for grouting. As you can see above, the radiant section of the floor has black square tiles set into the field of white octagonal tiles. To the left in the photo is where the shower will be. Directly in front is where the sink will be, the tub will be to the right of the sink, under the window, and the toilet will be to the bottom right. The photo is taken from the door into the bedroom. The floor still needs to be grouted and we need to insulate under the floor from the crawlspace below to complete the flooring project and get to the wainscoting and fixtures.
No word from the cat yet on what she thinks of this project to warm her tootsies in winter and cool her tummy in summer. But remember, design that's good for the cat is good for her humans!
Labels:
bathroom,
cat,
DIY,
historic preservation,
our house,
radiant heat,
tile
Monday, November 29, 2010
The French Doors - Oui Oui!
We have had a number of pleasant surprises in this house as we undo the work of previous owners in an effort to return the house to its former configuration. Since the house had been turned into 3 apartments in the 1940s, some odd things happened - like the closing off of the foyer so that a bathroom could be placed there! Access to the living room was probably closed off to the front door as well, since the front door probably accessed the upstairs apartment. The exterior door in the living room accessed the apartment on the right side of the house and the exterior door into the former doctor's office accessed the third apartment on the left side of the house.
For those of you familiar with houses from the late 1800s and early 1900s, there was often a set of French doors separating what most of us use as a living room now from the main foyer. The previous owners of our house had re-opened the doorway from the foyer to the living room, but only to the width of a single door. It was obvious to us that there had been a wider doorway there. There was a square indentation in the floor for the French door to lock one of the doors closed and the framing was new. When we were at the stage of removing walls that didn't belong, we found that - yes, indeed! - the original opening was wide enough for French doors!
Unfortunately, though some of the trim and doors that had been removed had been stored in the basement by some forward thinking person (or pack rat!), we did not still have the French doors. Fortunately, Black Dog Salvage is nearby. Now, if you enjoy looking at treasures from old buildings, check out your nearest architectural salvage store. It's great fun and you can find details you didn't even know you needed. Fortunately for us, we found a great set of oak French doors that are stained the color of the rest of our woodwork. My husband swears they might be our original doors.
Because we needed to build the oak door frame and had far more important tasks on our plate, these doors have been languishing in our doctor's office waiting room/library/dining room/office for far too long. As part of The Great Rearrangement, it is finally time to install the doors. As of Sunday afternoon, we have the stationary French door installed. The little matters of some missing hinge pins and a need to rearrange the living room so that the other door has room to swing kept us from completing this task, but those are quick fixes that should happen this week. The door looks great and really adds some class to our foyer!
Wednesday, November 24, 2010
The Great Rearrangement
One sometimes huge disadvantage of living in the house that you are rehabilitating is the constant shuffle of furniture, etc. to work on rooms. We have also inherited a lot of furniture since we moved into this house and, not having the proper place to set it up, we've got several rooms that look more like storage units than rooms of the house. Complicating matters is the fact that we've changed the purpose of several rooms multiple times. Fortunately, we had never actually finished these rooms so changing our minds hasn't had major consequences except for how to refer to the room that was to be the library, then the dining room, and now the office.
We have a lot of books, so having a library was a given. We envisioned a darkish room with lots of wooden shelves built in and a cozy seating nook. The former doctor's office waiting room at the front of the house seemed perfect. The leaded glass window added some elegance for the room. We had it all planned, right down to the dark wood ceiling.
We used the front half of the living room as a dining room. This wasn't a perfect solution because it is a long ways from the kitchen, but the table fit there. Then, we inherited a dining room suite and we realized that though we might not use it as such, the house really should have a formal dining room. At this point, it isn't obvious which room was the original dining room in the house. The rooms have been repurposed over the years so it is not immediately clear if our kitchen was the original kitchen. If it was, there isn't a candidate for the dining room immediately contiguous. Possibly, the room that will become the downstairs guest bedroom was the dining room, but by the time we got the house which had, by then, had 3 apartments carved out of it, that large room contained just a toilet and evidence of a tub and sink.
We decided that the former doctor's office waiting room/library should be the dining room. This wasn't a perfect solution and would still require carrying food down the hallway, but it would fit the inherited dining room suite. We still have lots of books, so we still had a need for a library. We also have an odd area with 5 doorways as you enter the house from the back porch. There are too many travel lanes here to place much furniture, but we could fill the walls with bookshelves. So that room has become our library and is mostly completed and filled with books.
Throughout this period, our working office with desks and computers has remained just off of the kitchen. The more we thought about it and what in the world we were going to do with all that furniture, we realized that the office should become the dining room. The kitchen is right there and the room is big enough and bright enough to withstand the heaviness of the furniture. That means that the doctor's office waiting room/library/dining room would become the office.
Now this, finally makes perfect sense! The old doctor's office has its own exterior door and can be shut off from the rest of the house so as we move towards our goal of self-employment we could actually see clients here. The room is large enough for our drawing tables, desks, and other office stuff with nice natural light and the leaded glass window for inspiration. We spent Sunday working on this great rearrangement. From a room packed to the gills with furniture and "stuff", there's now room to roll out a rug in the middle of the doctor's office waiting room/library/dining room/office floor. Of course now we've got to paint so the room is office color instead of library color, but we're getting there!
Labels:
adaptive reuse,
DIY,
historic preservation,
our house
Monday, November 15, 2010
Check One Task Off the (Long) List!
Not to dwell on (or in!) the attic, but we finished the insulation!! We'd like to think we did such a great job that the gas company will be paying us this year, but that's probably just a bit optimistic. It is good to have a clean attic with clean and fluffy insulation to keep our heat in the house. We've got our plywood laid out up there to store Christmas decorations and such, so we're already using the vast storage space that it is for now.
While we were up there, not only did we have the chance to remove the insulation, but also the old knob and tube wiring and other unused fixtures. One of our first tasks before we ever moved into the house was to rewire. So all of the old wiring had been cut, but at that time, the only access to the attic was through a very small hatch into a very dirty space so the knobs and tubes remained up there. Another removal was what was probably the ballast tank for the radiator system. It's still up there because it's too big to get down, but also because it's pretty cool with all of the rivets that hold it together. It's a great design piece that we'll find some use for.
We were hoping to find a million dollars hidden in the attic. No such luck, but we did find a few interesting things that we'll incorporate into a "museum" case in the wall when we finish the space. Our most recent finds were an envelope postmarked December 1913 - the year the house was built and a christening dress. The dress was in perfect shape, just dirty from being under the insulation. It's nothing fancy, but does have some embroidery on the yoke. I'm thinking we could come up with a gothic novel about how the dress found its way up there, but then I might get a little nervous when I hear normal creaks from above!
While we were up there, not only did we have the chance to remove the insulation, but also the old knob and tube wiring and other unused fixtures. One of our first tasks before we ever moved into the house was to rewire. So all of the old wiring had been cut, but at that time, the only access to the attic was through a very small hatch into a very dirty space so the knobs and tubes remained up there. Another removal was what was probably the ballast tank for the radiator system. It's still up there because it's too big to get down, but also because it's pretty cool with all of the rivets that hold it together. It's a great design piece that we'll find some use for.
We were hoping to find a million dollars hidden in the attic. No such luck, but we did find a few interesting things that we'll incorporate into a "museum" case in the wall when we finish the space. Our most recent finds were an envelope postmarked December 1913 - the year the house was built and a christening dress. The dress was in perfect shape, just dirty from being under the insulation. It's nothing fancy, but does have some embroidery on the yoke. I'm thinking we could come up with a gothic novel about how the dress found its way up there, but then I might get a little nervous when I hear normal creaks from above!
Labels:
attic,
DIY,
historic preservation,
insulation,
our house,
wiring
Monday, November 8, 2010
We've Got Bats in the Belfry!
Some people would say we have bats in the belfry for rehabilitating our old house, but those aren't the bats of which I speak. Our sanity aside, the bat (I think just one) is in our attic.
We spent the weekend on our ongoing task of replacing the old, dirty, blown-in fiberglass insulation in our attic. Suited up against the dust and fiberglass pieces that can cause itchiness if touched and respiratory problems if inhaled, we have a system where one of us crawls into the depths of the attic corners and fills plastic kitty-litter containers with the insulation and hands it back to the other for disposal in a trash bag. Once most of the insulation has been removed, a Shop Vac is used to get rid of the remaining pieces and accumulated dust. We clean out as many of the cavities as we can before back and knees protest too much then fill smaller holes with spray insulation foam and the cavities with fiberglass bats (not flying bats!).
There's a blog posting for another time about the environmental pros and cons of different types of insulation, but I'll be perfectly honest - we got a quote for spray foam and decided that we'd go with fiberglass for now. Our attic space will one day be an amazing room. It has a dormer for light and is essentially a big square space with high ceilings throughout most of it and plenty of place for storage where knee walls will be placed one day. Today, however, it is just the attic and if we can improve the energy efficiency up there, that will lower our heating bills. One day, when we turn that into a room in the house, we will want to spray foam the ceiling/roof and we can easily remove the fiberglass bats if we so choose.
We are almost done with replacing the attic insulation and I was admiring our work, thinking about what a great space the attic will be one day, mentally constructing the knees walls and all the storage they will provide, calculating how long it will take to finish the job, congratulating ourselves on not having signs of creatures in the attic, and measuring and cutting the insulation to be installed when...I thought I saw something. Daylight savings time started on Sunday, so it was starting to get dark outside, though it was plenty light in the attic from our shop lights, so I thought my eyes were playing tricks on me.
Then frrrrrrr...whiz...ack! It was a bat. Circling the center of the attic where I was cutting the insulation. I was out of there so fast that I was halfway down the attic ladder when I realized that I ought to turn around or I'd end up on my face in the hallway! My poor husband was still up there, stuck in the far corner of the attic and I stopped to think..."Gosh, I hope he isn't stuck back there!" Well, down he came soon after and we abandoned ship for the night. We'll wait for a sunny day to go back up and finish the insulation!
Labels:
bats,
DIY,
historic preservation,
insulation,
our house
Tuesday, November 2, 2010
Saving the Viewsheds
I've gotten so that I look out the top of our windows to look over the
unfortunate views that have developed from our house over time. I
imagine that if the Quonset hut (and all the junk behind it) were gone,
we might have a great view of the New River. From upstairs, I can see the upper half of the mountains on either side, their colorful leaves in fall, the ice in winter, and the slow spread of spring green. In our back yard, the
cute little Victorian house is marred by the swath of power line
scarring the mountain behind it.
Historic preservation is not just about saving buildings. It's also about preserving land and viewsheds. For those unfamiliar with the term, a viewshed is what you see from a particular place. So it might be the familiar views of a historic Main Street or the untamed wilderness along stretches of a meandering river or the field and mountain views from a family homestead.
Many of us take these views for granted until something changes. Unfortunately, that something is usually something irreversible. Tearing down the historic courthouse in downtown's central square. Widening the highway and razing historic farmhouses or entire neighborhoods. Placing a campground on the river's edge. Building a WalMart on a Civil War battlefield or a McMansion on top of a scenic vista. Developing a huge housing complex across the river from an 18th century plantation. While oftentimes these changes are the result of greed, certainly nature has a hand in fires, floods, earthquakes, tornadoes, landslides, and hurricanes that can also drastically change viewsheds. Nature can be forgiven though, while human hubris cannot.
In our area, the New River Land Trust gives landowners who want to protect their property from becoming the next big development or industrial site on the river the opportunity to donate a conservation easement
. With the conservation easement, the donor donates the rights to develop the land to a state agency or land trust in exchange for generous tax credits and deductions. The landowner remains on the property and gets the peace of mind that the land won't be developed. His neighbors and those who passively "use" the land by driving, hiking, or boating by receive the benefit of a preserved viewshed.
Historic preservationists have a similar tool in preservation easements available through the Virginia Department of Historic Resources. For buildings listed on the National Register of Historic Places, a preservation easement protects the characteristics that made the building eligible for the National Register including architectural features, outbuildings, archaeological sites, historic landscaping, and open space. The property is protected under the easement, though modernization that doesn't compromise the building is allowed. The owner receives tax credits and continues to live on the property. His neighbors and passersby continue to admire the building and its contribution to the historic character of the community.
Tuesday, October 26, 2010
Vines!
An advantage of buying an old house is that, usually, they come with mature landscapes. So instead of the stark, treeless sea of green that often accompanies new construction, you get large shade trees, flowering bulbs, old varieties of roses, apple trees, and grapevines. You gaze in wonder and admiration at the previous owners who had the foresight to plant crocuses, daffodils, and hyacinths that pop up their heads when it seems that winter will never end. You pick some lilacs to bring some of the heady smell of spring inside. You photograph the roses, irises, and lilies thinking they're the most beautiful ever. You enjoy the cool shade of the maples and huge common hackberry tree that keep the house from getting to hot in summer.
And then there's the vines. Somebody planted vines everywhere. They try to strangle the lilacs. They climb up the side of the house. The come up in the lawn. What were the previous owners thinking?!? There's English ivy, poison ivy, grapevines, and several unidentified varieties. You can pull and pull on them, but their roots go to China and I'm pretty certain some of these vines thrive on being cut off. We have other weeds too, but the vines are insidious. I'm fighting them again this fall as I clear old growth from the flower gardens and find that the vines are again trying to strangle the lilacs. They won't win. Lilacs are one of my favorite flowers so I take it personally when anything tries to strangle them.
Next spring, the vines are toast. I'll be studying up on eco-friendly ways to kill them (now that seems like an oxymoron) this winter. But if eco-friendly doesn't work? I have no qualms about using Round-Up and getting rid of my nemeses for good as long as it doesn't kill the "good" plants. Did I mention that mature landscapes can also be a disadvantage of buying an old house?
Thursday, October 21, 2010
Busy as a Squirrel in Fall
![]() |
| Scraping the trim to bare wood. |
As happens every fall around here, we're busy finishing up projects before the weather gets cool. That means painting the trim on the first floor of front of the house that was painstakingly scraped this summer. Fortunately, the house is brick so the painting is minimal, but it's all pretty high off the ground. And this is an old house, so of course, nothing is as easy as it seems. There were some rotted boards that needed replacing and since our trim is not just plain old trim (there's crown molding and other details in it), replacing it wasn't always easy. You can see from the pictures that some pretty nice lumber was used originally for the trim. You can also see that we have 2 more stories of trim (and 4 more sides of the house!) to scrape to finish the exterior work. Ah, to have more free time!
![]() |
| Painting the trim. |
Before it gets any colder, we'll also be putting up some more new storm windows and finishing the attic insulation. We've already made a huge dent in our energy costs with the insulation and new storm windows we've added so far, but there's always more you can do to an old house!
How we've addressed painting, scraping, insulation, and storm windows and how we might have done it greener are all topics for later postings, but the days are getting colder and we've got work to do!
Tuesday, October 5, 2010
Just Because You Saw It On TV Doesn't Mean You Should Do it
Okay, so that title applies to many of the reality, adventure, and stupid people trick shows out there today. I'm specifically targeting the many DIY shows out there today. We spent about 4 months working on our house before we had to move in because we'd sold our old house. Once we moved in, and got the cable hooked up, things slowed down significantly. We joke that we watch more DIY than we do now. But, we're also far more qualified than lots of the yahoos out there pretending they know what they're doing. Rather than being amused by their pratfalls, we get frustrated that people who don't even own a hammer are allowed on these shows! Construction is dangerous, and can be deadly, if you haven't the slightest idea what you're doing!
There are some really great shows on PBS, HGTV, and DIY, like This Old House
, Holmes on Homes
, or some of the bathroom and kitchen renovation shows where there's a licensed contractor involved either doing the work or working right alongside the home owners. Then there are some of the other shows like Renovation Realities where many of the home owners don't know up from down and should be licensed to use a sledgehammer. And what's with the people who use an axe for demolition? Unfortunately, on most of these shows, the couples seem to have rather precarious relationships that only get worse as they start blaming each other for everything that goes wrong. There's no fun to be had here! In fact, these shows should be precautionary tales to people with no experience who think renovation sounds like a good idea. Don't do it! Leave it to the professionals!
Or how about Family Renovation. Why would anyone think it would be a good idea to remain in a house while major (adding a third floor!) renovations are taking place? Let alone someone with 5 young kids? Somehow they thought the contractor would just stay out of their way while they do as they please: waltzing around barefoot with staples, nails and other sharp objects on the lawn and in the house; breathing in dust and mold from construction and a flooded basement; wandering wherever they like oblivious of what's going on over their heads or being thrown into the dumpster beside them. Most every episode of the show illustrates child endangerment. On the part of the parents, not the contractor. What were the parents thinking? And how many people watch these shows and think it might be a good idea for them to do the same thing?
Do It Yourself renovations take time, money, knowledge, and guts. You can get the knowledge by reading, watching TV, or working with an expert. Know your limits. If you don't have the knowledge (or the guts), don't do it! Hire someone who does and take on other projects yourself. For us, that meant not climbing on the steep roof, 3 stories up, to fix the shingles and repoint and flash the chimneys and hiring an HVAC professional to install our new boiler and some new radiators. Expensive to hire professionals, but well worth it for our health and safety!
Friday, October 1, 2010
Saving Our Wooden Windows
A recent blog posting from Preservation Nation prompted me to talk about our historic wooden windows today. I may have mentioned that we have 42 windows in our house. With the exception of the 2 basement windows, they are all the original 1-over-1 double hung, single pane, wooden windows. These windows are generally 40" wide x 68" tall downstairs and 64" tall upstairs where the ceiling height is a foot lower. There are exceptions, where there are 3 windows together and the center window is 33" wide, with 20" flanking windows. Or the shorter window over the kitchen sink. Or the 50" wide window with the 1' high top sash of leaded glass in the front of the house.
As you can guess from the multitude and size of the windows, even though most of the windows are unremarkable in style, they are a character defining feature of the house. If you listen to the replacement window people, our windows are the enemy and must be replaced. They are costing us thousands of dollars in heating bills because of the heat flowing out through those single panes and must be replaced by double- 0r triple- glazed models, preferably those made of vinyl, because that's "green." Let's see how industry spin meets reality by looking at our century-old wooden windows more closely:
- These windows are made of old growth wood. Those growth rings are close together, leaving less room for moisture to get in and making them more resistant to bugs and rot. The material these windows are made of is not available anymore. Why would we willingly throw these long lasting windows (did I mention they are almost 100 years old and still going strong) in the landfill to replace them with something new made from a resource-intensive process? Saving embodied energy is green. Saving money gives you more green.
- Our window sashes are solid, they move well (except where they have been painted shut), and in most cases the ropes are still intact. In some cases glass has cracked or is loose in the frame, but generally, the windows are in good shape. These windows don't need to be replaced, but they do need to be reworked. We have been taking them out one by one, reglazing them, and rehanging them with new ropes and insulated weight pockets. It's a long process, but well worth it.
- Single panes don't cloud up. The rope and weight mechanism is simple mechanically and pretty easy to fix if the rope breaks. Did I mention that our windows are 100 years old? The quality and longevity of some of the new windows seems a little suspect. I personally know of several people who have had to replace windows that are 10-20 years old because they have clouded up between the layers of glass or the plastic and metal mechanisms have broken.
- Our windows are plain, but character-defining. Have you noticed that many houses never look the same after the windows have been replaced? Either the character defining features (for instance the number of panes) in the previous windows have been removed, or the opening that the windows inhabit has been shrunk to accommodate the new vinyl window changing the trim and impact of the windows.
- All of our windows have new storms. Studies show that adding a storm window to a single pane window is just as energy efficient as a new window. You get to keep your old, historic, character defining windows, spend less money than replacing them on a storm window, and still get the energy benefits. And guess what, storm windows can have screens too so you can take advantage of all that natural ventilation in the summer that your windows provide.
- We've insulated our attic and walls and we've insulated and caulked around the windows. Here's the stuff the window salesmen don't want you to know...more heat is lost through your uninsulated attic and walls than through your windows AND, here's the kicker, it takes, on average 240 years to recoup the cost of replacing your windows through energy savings.
So, if you replace your windows that are over 60 years old, you throw away embodied energy and old growth trees, you contribute to the growing landfill problem, you change the character of your historic house, and you spend a lot of money in your pursuit of being green. You'd have saved more energy if you insulated your house better, repaired and caulked around your old windows, and bought new storm windows. Hmmm...seems obvious what the greener answer is here.
Subscribe to:
Posts (Atom)